


Why You Shouldn’t Install Facade Tile on a Dusty Wall, Even If the Adhesive Seems Strong
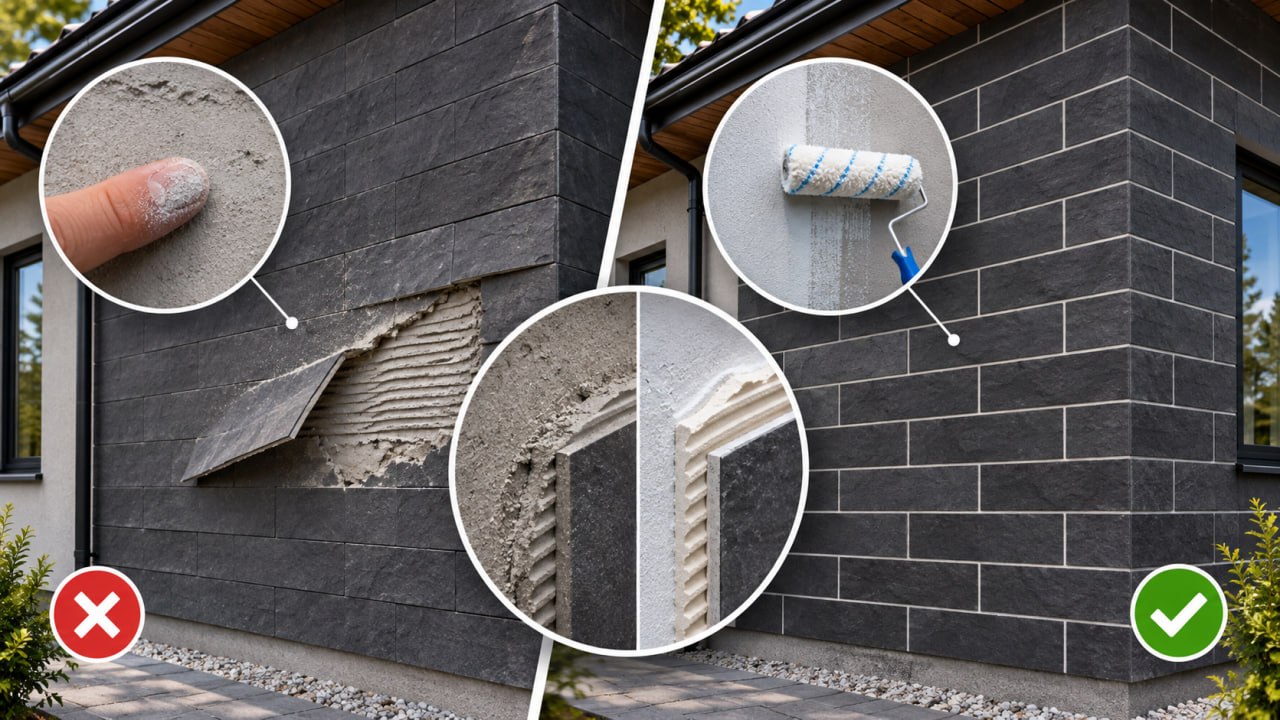
After sanding and levelling, an almost invisible dust stays on the wall. Tile holds on it at first and comes away a season or two later: the adhesive bonded not to the wall but to a loose layer. We explain the mechanism, why primer does not replace cleaning, give the four preparation steps from the KORDEKO instructions, and look separately at walls over insulation.
After sanding plaster, leveling walls, or removing an old finish, construction dust often remains on the surface. Sometimes it is barely visible, so installers may simply inspect the wall quickly and begin bonding the tile. The adhesive spreads normally, the cladding is pressed against the wall, and at first it may appear to hold firmly.
But initial adhesion does not guarantee reliable bonding for years. Dust creates an intermediate layer between the adhesive and the substrate, which can eventually cause the cladding to detach. This mistake is especially risky on exterior facades, where the surface is constantly exposed to moisture and temperature fluctuations.
How Does Construction Dust Affect Tile Adhesion?
For cladding to remain securely bonded, the adhesive must come into direct contact with a strong and stable substrate.
When the surface is covered with dust, part of the adhesive bonds not directly to the wall, but to loose fine particles. As a result, the strength of the connection may depend on how firmly that dust itself is attached to the surface.
A kind of weak bonding chain is created: the tile bonds to the adhesive, the adhesive bonds to the dusty layer, and the dusty layer may not be securely connected to the wall.
Even if the adhesive has good technical properties, a weak intermediate layer reduces the reliability of the entire system.
That is why surface preparation should aim not only for visual cleanliness, but also for the removal of loose particles that prevent direct contact between the adhesive and the wall.
Why Can Tile Hold at First and Then Begin to Detach?
Immediately after installation, the tile may appear to be installed correctly. However, this does not mean that the adhesive bond has already reached its required strength.
During service, the facade is exposed to several types of stress.
Temperature changes. Materials expand and contract as they heat and cool. If the original bond to the substrate is weak, these movements can contribute to delamination.
Moisture. If cracks or poorly executed junctions allow water into the facade system, additional stress may develop in already weakened areas.
Freeze-thaw cycles. During cold weather, moisture that enters defective areas can freeze and create additional pressure.
As a result, cladding that appeared secure immediately after installation may begin to detach over time.
However, it would be incorrect to assume that dust is always the cause of delamination. Similar damage can result from the wrong adhesive, weak plaster, reinforcement problems, or other installation mistakes.
Why Doesn’t Primer Replace Wall Cleaning?
A common mistake is to assume that primer will automatically solve the problem of a dusty surface.
In reality, cleaning and priming perform different functions.
Cleaning removes dirt and loose particles. Primer prepares the substrate for the following adhesive layer and helps create suitable bonding conditions.
According to KORDEKO installation instructions, walls should first be cleaned of dust and dirt, checked for flatness, cracks, and voids, leveled where necessary, and only then primed.
The primer type depends on the substrate:
- Deep-penetrating primer is used on absorbent surfaces such as putty, sandstone, and limestone.
- Quartz-filled concrete contact primer is used on dense, low-absorbency surfaces where compatible with the specific substrate.
Applying primer over a heavy layer of dust does not replace proper cleaning. Even after priming, the surface must remain strong and suitable for cladding.
How Should a Wall Be Prepared Before Installing Flexible Tile?
KORDEKO Flexible Tile (PletaFlex) is installed on a properly prepared substrate using a suitable adhesive. Bonding quality depends not only on the properties of the tile itself, but also on correct execution of every preparation stage.
The process includes several steps.
1. Clean the Surface
Before installation, construction dust, dirt, and other contaminants that may reduce adhesion must be removed.
Particular attention should be paid to walls after sanding, cutting construction materials, or removing old finishes.
A simple preliminary check can be performed by running a clean hand over the dry surface. If a visible layer of dust remains on the hand, the wall requires further cleaning.
However, this is only a basic check and not a full assessment of substrate strength.
2. Check the Strength of the Wall
The surface should not crumble or contain loose areas.
If the existing plaster is unstable, it must be repaired. A new adhesive layer cannot be expected to hold the cladding together with a failing substrate.
Cracks, voids, and irregularities should also be checked.
3. Apply Primer
After cleaning and completing any necessary repairs, apply a primer suitable for the substrate type.
The primer should be compatible with the adhesive and the intended operating conditions.
Tile installation should begin only after the primed surface has dried in accordance with the product manufacturer’s requirements.
4. Apply the Adhesive Correctly
For exterior KORDEKO installation, a frost-resistant adhesive is recommended.
According to the installation instructions, a 4 mm notched trowel is used for smooth tile and a 6 mm notched trowel for textured tile.
After placement, the tile should be pressed firmly with a flat float to remove trapped air from beneath the cladding.
Even when all these recommendations are followed, the reliability of the finished bond still depends on the quality of the prepared substrate.
Is Dust Especially Dangerous When Installing Tile Over Insulation?
In exterior thermal insulation systems, substrate preparation is particularly important because the decorative cladding is installed over several interconnected layers.
Facade Insulation includes thermal insulation boards, fixings, a reinforcement layer with fiberglass mesh, primer, and the final finish.
The general requirements for external thermal insulation composite systems (ETICS) are set out in the European assessment documents published by EOTA.
If the reinforcement layer is weak, contaminated, or covered with construction dust, adhesion of the final cladding may be reduced.
Correcting such defects after the facade has been completed is much more difficult than preparing the surface properly beforehand.
It is also important to remember that dust is not the only possible problem. Reinforcement quality, cracks, and correct insulation fixing must also be checked.
KORDEKO Flexible Tile has a low weight and can accommodate small substrate movements, but these properties cannot compensate for an insufficient adhesive bond.
Can Bond Quality Be Checked After Installation?
If cladding has already been installed over a questionable substrate, its long-term reliability cannot be determined by appearance alone.
The absence of visible defects immediately after installation does not prove that all layers are securely bonded.
If installation errors are suspected, the condition of both the substrate and the cladding should be assessed. If delamination or damage is found, it is important to determine at which layer the failure occurred.
For example, the tile may detach together with the adhesive, part of the plaster, or a damaged reinforcement layer. Each situation requires a different repair approach.
If the problem is limited to one area, local repair may be sufficient. If defects are widespread, a more thorough assessment of the facade system may be required.
See also: deep-penetrating primer or concrete contact primer; why facades crack and how to avoid it; local facade repair without redoing the whole facade.
Conclusion
Facade tile should not be bonded to a dusty wall because construction dust prevents reliable contact between the adhesive and the substrate. Even if the cladding initially appears secure, a weak intermediate layer can eventually cause delamination.
Primer helps prepare the surface, but it does not replace cleaning or the removal of unstable areas.
When installing KORDEKO Flexible Tile, the correct sequence should be followed: cleaning, inspection of the wall, leveling where necessary, priming, and bonding.
Removing dust requires far less time and money than repairing a damaged facade later. Proper substrate preparation is therefore not an optional extra step, but an essential part of reliable installation.
Frequently asked questions
Why does tile on a dusty wall hold at first and then come off?
Does primer replace cleaning the wall?
How can you quickly check that the wall is clean enough?
Need advice on your facade?
- Get a free consultation for your project
- Find out which material suits your facade
- We'll answer all your questions and help you choose